The ‘Accounting’ tab manages your Chart of Accounts, Transactions, Items, and Price Levels. From the Accounting tab you can export transactions into a CSV or Excel spreadsheet for import into an accounting software. Also, you can set up integration with QuickBooks.
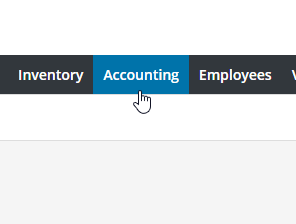
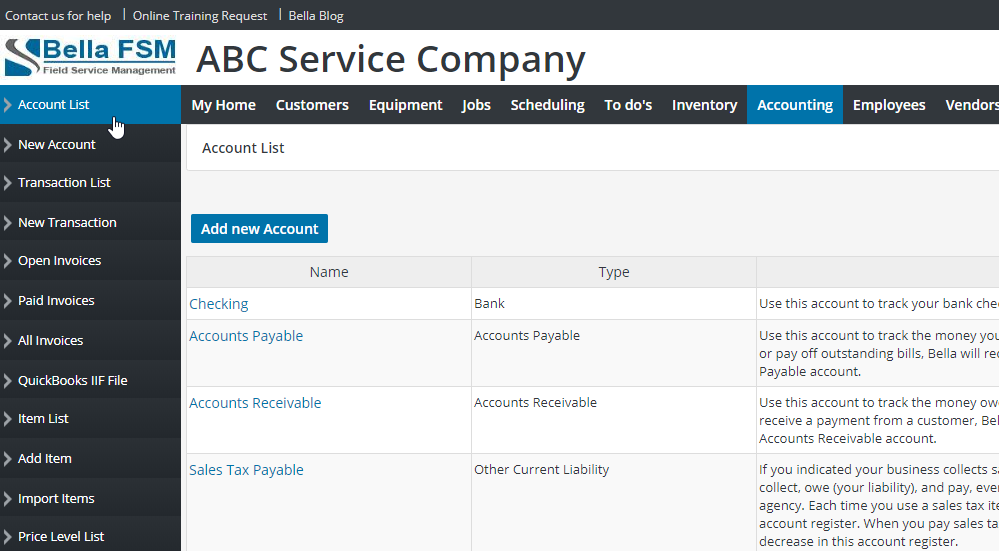
Chart of Accounts – The Accounts List is your Chart of Accounts. Bella has created several Accounts to help you get started. To edit an Account click on the Account Name in the list. To see the transaction details for an Account click on “Balance” in the list.
- Checking – Use this account to track your checking account
- Accounts Payable – Use this account to track the money your business owes to others. When you enter a new bill, or pay off outstanding bills, Bella will record the transaction in the register for your Accounts Payable account.
- Accounts Receivable – Use this account to track the money owed to your business. When you create an Invoice or receive a payment from a customer, Bella records the transaction in the register for your Accounts Receivable account.
- Payroll Expenses – The Payroll Expenses account tracks payroll items that are an expense to your company. These include salaries, wages, bonuses, commissions, company contributions such as a company-paid health plan, and the company-paid portion of taxes such as social security and Medicare.
- Payroll Liabilities – The Payroll Liabilities account tracks taxes that you deduct from employees paychecks and hold temporarily until you turn them over to the government. These include federal and state income withholding taxes, local taxes, and the employee-paid portion of taxes such as social security and Medicare.
- Sales Tax Payable – If you indicated your business collects sales tax, use this account to track all the sales tax you collect, owe (your liability), and pay, even if you collect sales tax for more than one tax agency. Each time you use a sales tax item, Bella enters the amount as an increase in this account register. When you pay sales tax to a tax agency, Bella enters the amount as a decrease in this account register. This Account cannot be modified.
- Undeposited Funds – Use this account to hold money you’ve collected until you deposit it in a bank account. This Account cannot be modified.
- Cost of Goods Sold – Use this account to track how much you paid for goods and materials held in inventory that you eventually sold. After you enter a sale, Bella adjusts your costs of goods sold by multiplying the quantity sold times the cost of each item.
- Inventory Asset – This account tracks the current value of your inventory.
- Uncategorized Income – Use this account to enter an adjustment to reconcile small accounting discrepancies. This Account cannot be modified.
- Uncategorized Expense – Use this account to enter an adjustment to reconcile small accounting discrepancies. This Account cannot be modified.
Account Types – The following are the available Account Types which cannot be modified:
- Bank – Checking, savings, and money market accounts. Add one bank account for every account your company has at a bank or other financial institution.
- Accounts Receivable – Transactions related to the customers that owe you money, including invoices, payments, deposits of payments, refunds, credit memos, and statements. Most companies have only one A/R account.
- Other Current Assets – Assets that are likely to be converted to cash or used up within one year, such as petty cash, notes receivable due within a year, prepaid expenses, and security deposits.
- Fixed Assets – Depreciable assets your company owns that aren’t likely to be converted into cash within a year, such as equipment or furniture.
- Other Asset – Any asset that is neither a current asset nor a fixed asset, such as long-term notes receivable.
- Accounts Payable – Transactions related to money you owe, including bills, bill payments, and any credit you have with vendors. See also current and long-term liability accounts.
- Credit Card – Credit card purchases, bills, and payments.
- Current Liability – Liabilities that are scheduled to be paid within one year, such as sales tax, payroll taxes, accrued or deferred salaries, and short-term loans.
- Long Term Liability – Liabilities such as loans or mortgages scheduled to be paid over periods longer than one year.
- Equity – Owner’s equity, including capital investment, drawings, and retained earnings.
- Income – The main source of money coming into your company.
- Other Income – Money received for something other than normal business operations, such as interest income.
- Expense – Money that’s leaving your company.
- Other Expense – Money spent on something other than normal business operations, such as corporate taxes.
- Cost of Goods Sold – The cost of goods and materials held in inventory and then sold.
Transaction List – The Transaction List displays all transactions for your business. This is similar to the Transaction Summary List is QuickBooks. The list may be sorted by Transaction Type, Date Range, Customer, Job, Employee, and Vendor. To edit a Transaction click on the Transaction ID in the table. To export Transactions select the export format at the lower right of the list. You have the option to select specific data fields to export.
Transaction Types– The following are the available Transactions Types which cannot be modified:
- Enter Bill – Enter a Bill from Vendors such as suppliers, contractors, or utilities. You enter bills in the New Transaction menu.
- Pay Bill – Pay Vendors such as suppliers, contractors, or utilities. You pay Bill’s in the New Transaction menu.
- Bill Refund – Credit from a Vendors such as suppliers, contractors, or utilities. You enter bill refunds in the New Transaction menu.
- Write Check – Enter checks in the New Transaction menu.
- Deposit – Enter bank deposits in the New Transaction menu.
- Invoice – Invoices are created by clicking “Create Invoice” on the Job page.
- Receive Payment – Payment from Customer. Enter payments in the Enter New Transaction menu or clicking “Payment” in the Invoice List.
- Credit Card Charge– Enter credit card charges in the New Transaction menu.
- Credit Card Refund – Enter credit card refunds in the New Transaction menu.
Split Account – The Split Account may be used when entering a transaction. You can split the transaction to another Account to more accurately track Income and Expenses. You are not required to use this feature. If you are not familiar with Split Accounts we suggest discussing this feature with your accountant.
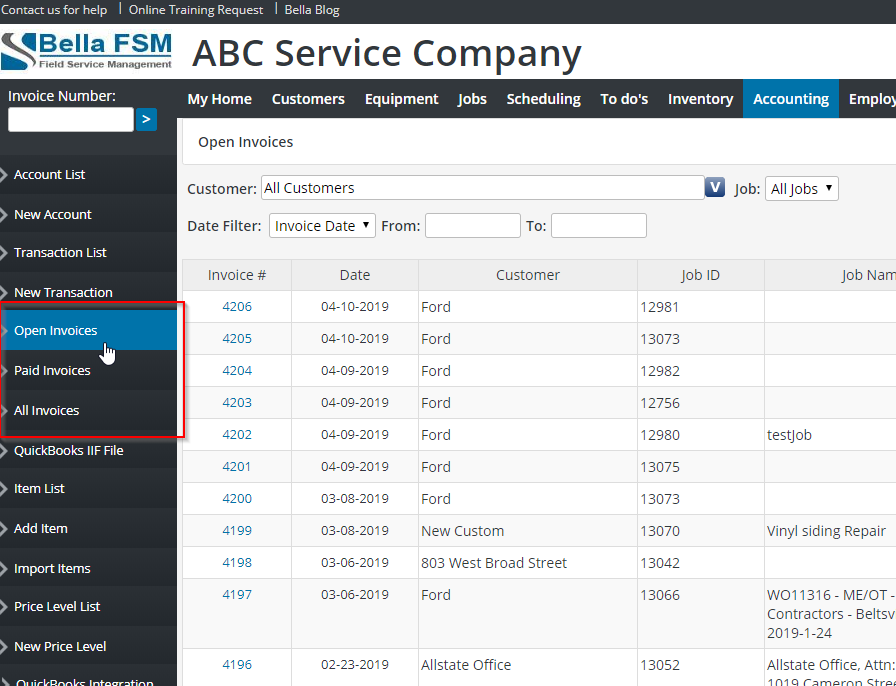
Invoices are included in the Transaction List, however they are also listed in there own list. Use the left side menus in the Accounting tab to view.
- Open Invoices displays all outstanding Invoices. The invoice Due Date will display red if the current date is past the invoice Due Date and the invoice has not been marked paid.
- Paid Invoices displays all paid invoices.
- To mark an invoice paid enter a ‘Receive Payment’ transaction and check the ‘Invoice Paid’ box.
- To delete a paid invoice all payment transactions applied to invoice must first be deleted. After all invoice payments are deleted the invoice will be moved to the Open Invoice List which may then be deleted.
- All Invoices displays all open, overdue, and paid invoices.
- To edit an Invoice click on the Invoice Number in the list. Invoice details may be modified and saved, however, items cannot be modified. The invoice must be deleted and then re-created
- To print an invoice open the invoice and click ‘View PDF’ at the top or bottom of the page.
Items List – Items function the same as in QuickBooks. An Item may be added by selecting the left side menu ‘Add Item’ or import a list by clicking the left side menu ‘Import Items’. Items are the services your business provide to your customers. The Items will be displayed when creating a job, work order, estimate and invoice. To edit an Item click on the Item ID or Item Name in the table.
- Sales Tax Item – A Sales Tax Item may be check “Most Commonly Used” which will automatically add this sales tax Item to the Job Items list every time a New Job is created. This will save you time eliminating the need to add the same Sales Tax Item each time.
Items Types – The following are the available Item Types which cannot be modified.
- Service – Services you charge for or purchase. Examples include specialized labor, consulting hours, and professional fees.
- Inventory part – Goods you purchase, track as inventory, and resell.
- Non-inventory part – Goods you buy but don’t track (such as office supplies), or materials you buy for a specific job that you charge back to your customer.
- Other charge – Miscellaneous labor, material, or part charges such as delivery charges, setup fees, and service charges, bounced checks, late fees, opening balance, reimbursable expenses, retainers, surcharges, gift certificates, prepayments, retainers, sales tax, and shipping and handling fees.
- Discount – Subtracts a percentage or fixed amount from the total Job Item List.
- Sales Tax Item – Calculates sales tax at the specified rate.
Price Levels – There are two types of Price Level you may create in Bella:
- Fixed % – Use this type of Price Level to apply a fixed percentage increase or decrease to all your standard prices when creating a Price List for a customer or a promotional Price List for many customers. There are many ways to apply a Fixed % Price Level.
- Per Item – Use this type of price level to set custom prices for individual items when creating a Price List for a customer or a promotional Price List for many customers. There are many ways to apply a Per Item Price Level.
- Price Levels may be applied to a Customer for creating a Work Order, Estimate, and Invoice.
- Or, Price Levels may be applied to individual Job Items when creating a Work Order, Estimate, and Invoice.
Bella FSM QuickBooks Integrator is designed for these versions of QuickBooks:
- U.S. editions of QuickBooks Financial Software products
- QuickBooks Enterprise Solutions (2015 or later)
- QuickBooks Premier (2015 or later)
- QuickBooks Pro (2015 or later)
- Canadian editions of QuickBooks (2015 or later)
- UK editions of QuickBooks (2015 or later)
QuickBooks Integrator Settings:
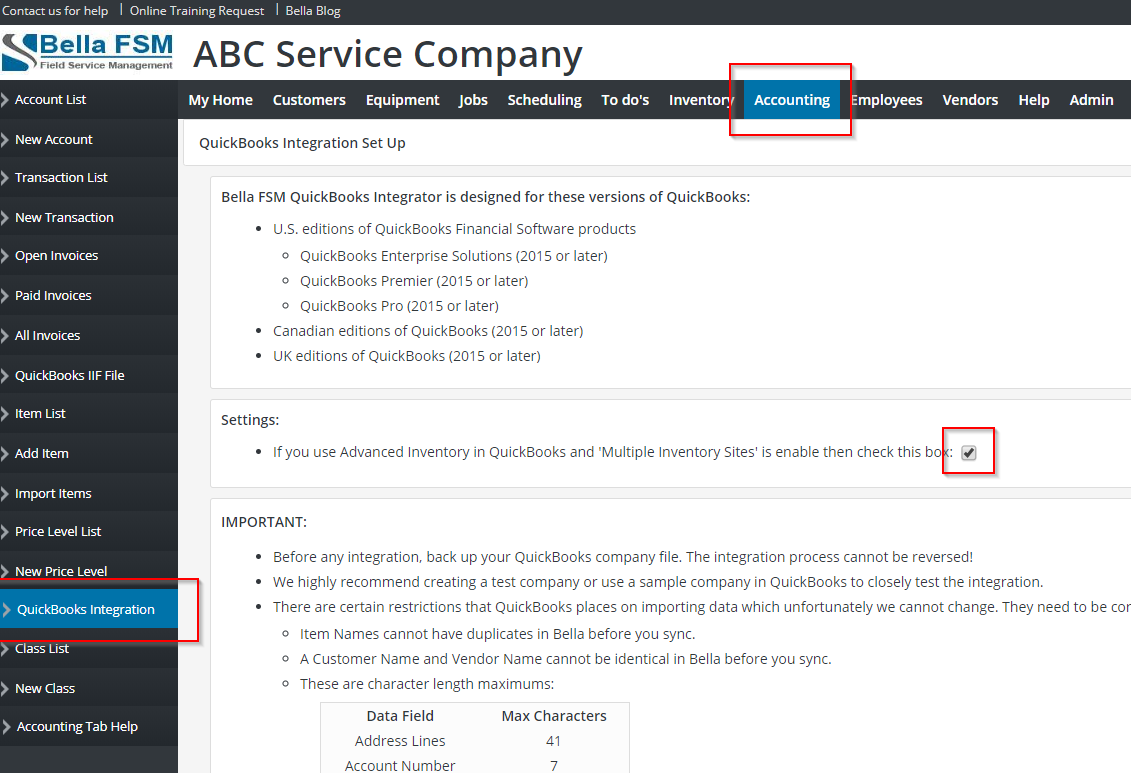
- If you use Advanced Inventory in QuickBooks and ‘Multiple Inventory Sites’ is enable then be sure to select this setting in Bella FSM. As shown in the image below, go to the ‘Accounting’ tab then click the left side menu “QuickBooks Integration” then select the advanced inventory checkbox:
IMPORTANT:
- Before any integration, backup your QuickBooks company file. The integration process cannot be reversed!
- We highly recommend creating a test company or use a sample company in QuickBooks to closely test the integration.
- There are certain restrictions that QuickBooks places on importing data which unfortunately we cannot change. They need to be corrected or the data will not sync:
- Item Names cannot have duplicates in Bella before you sync.
- A Customer Name and Vendor Name cannot be identical in Bella before you sync.
- These are character length maximums:
- Address Lines – 41
- Account Number – 7
- Class Name – 31
- Customer Name – 41
- Invoice Number – 11
- Item Description – 4095
- Item Name – 31
- Item Part Number – 31
- Job Description – 99
- Job Name – 41
- PO Number – 25
- Vendor Name – 41
Step 1
- Download the Bella FSM QuickBooks Integrator (BellaFSM.qwc file) to your Windows desktop computer. Click the “Click Here” link in “Accounting” tab left side menu “QuickBooks Integration” Step 1 section. There is no need to open this file. Simply download to your desktop or a folder.

Step 2
- Confirm you have the QuickBooks Web Connector (version 2.2 or higher) downloaded on your Windows desktop computer. Most likely it was installed when you installed QuickBooks.
- Open QuickBooks and go to File > Update Web Services. The QuickBooks Web Connector pop up window will open.
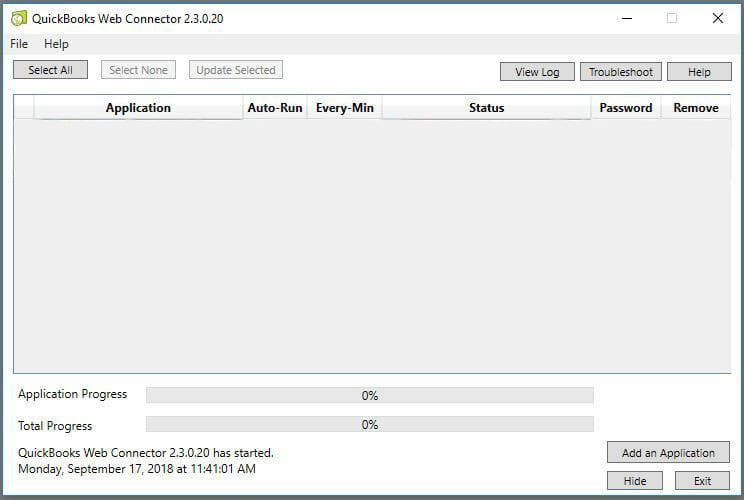
- If the QuickBooks Web Connector pop-up does not open Click Here and download any version higher than 2.2. Follow the installation instructions carefully.
- When the QuickBooks Web Connector pop-up opens, click ‘Add an Application’ in the lower right of pop-up.
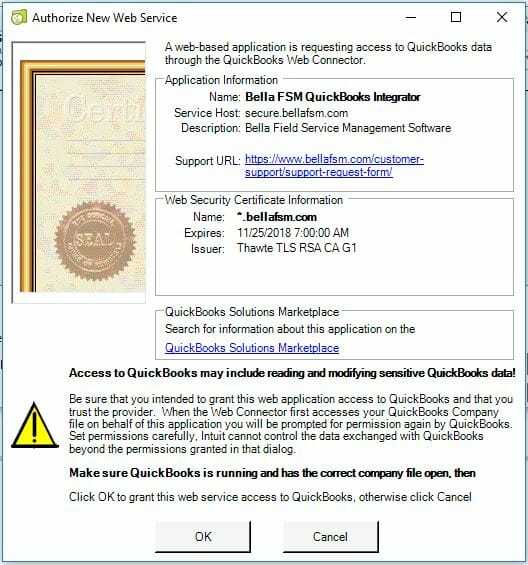
- The ‘Authorize New Web Service’ pop-up will open for Bella FSM QuickBooks Integrator. Click ‘OK’. (If this pop-up does not open, find the BellaFSM.qwc file you downloaded in Step 1 and open.)
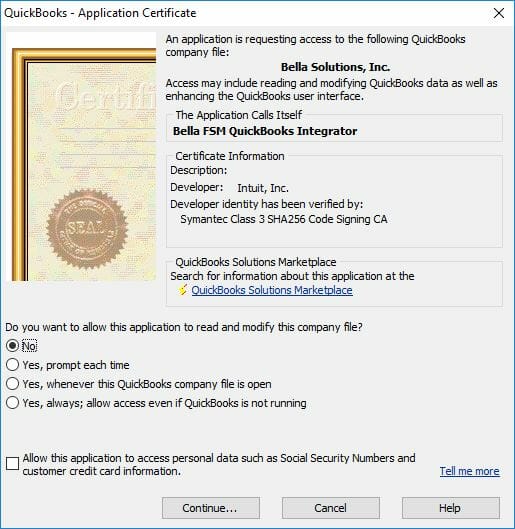
- The ‘QuickBooks – Application Certificate’ pop-up will then open. Select one of the three ‘Yes’ options and click Continue.
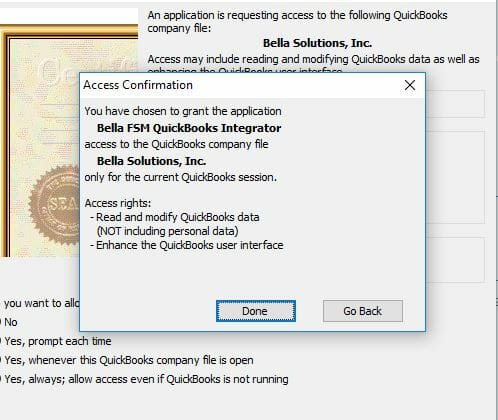
- The ‘Access Confirmation’ pop-up will then open. Click ‘Done’.
- The Bella FSM QuickBooks Integrator is now listed in your QuickBooks Web Connector.
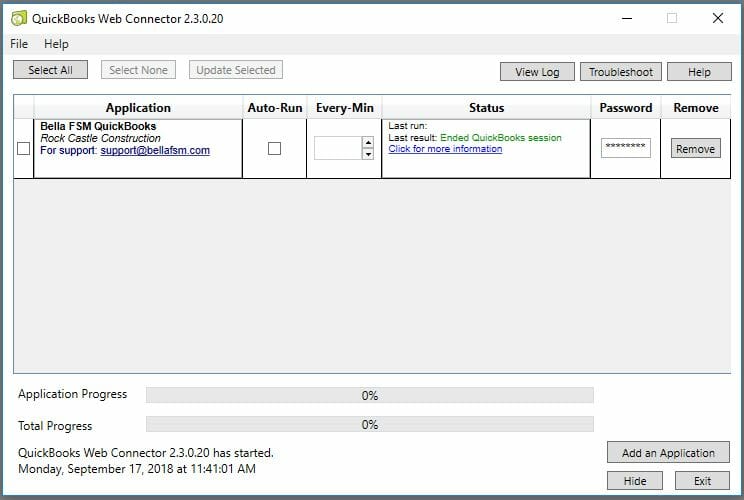
- Enter your Bella FSM password in the ‘Password’ box. It must be the password associated with the Bella FSM Admin username that downloaded the Bella FSM QuickBooks .qwc file downloaded in Step 1.
- The Auto-Run is automatically checked and Every-Min is set to 1440. You can increase this number or uncheck Auto-Run, however do not decrease the Every-Min number.
- Make sure you have Bella open and close all windows in QuickBooks before syncing.
- To manually sync, check the box to the left of ‘Bella FSM QuickBooks Integrator’ and then click ‘Update Selected’.
