Customers are the building blocks for your business. Jobs, quotes, invoices, and payments are all associated with customers.
Customers are also where details like multiple contacts and locations are created and managed along with job and customer communication history.
Creating a New Customer
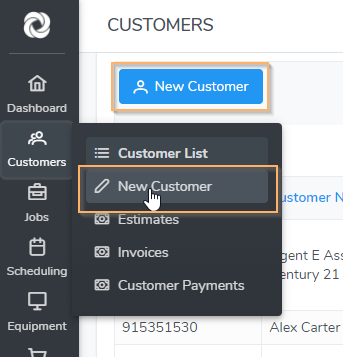
Click the left side menu ‘Customer’ then click ‘New Customer’ or click ‘Customer List’ then click the ‘New Customer’ button at the top of the page:

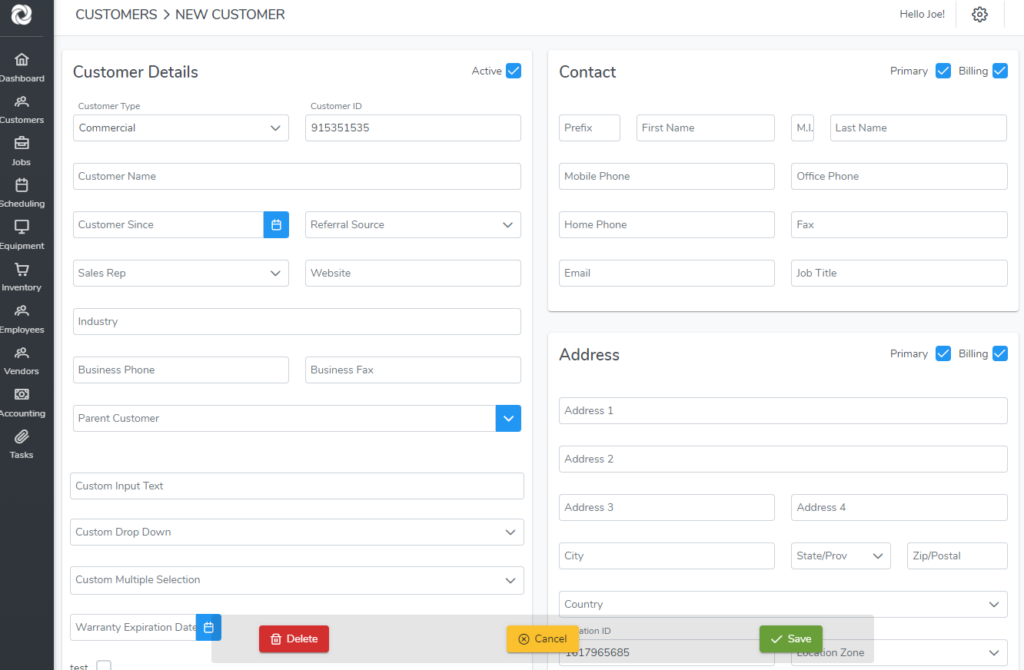
When the New Customer page opens, you can enter the information

Customer Details
When creating a customer this is where you can select the customer type, enter a Customer ID (this field will auto-populate with a number in the next sequential order, however you can edit). Enter a customer name which can be either a company name or persons name. You can select a referral source, enter customer since date, etc…
Contact
Optional contact information for your customer which would be used to send email alerts, displayed in the job list and calendar views, displayed on PDF Forms such as Work Orders, Estimates, and Invoices (if selected to display in Form settings).
Address
Optional address information which would be displayed in the Job List and calendar views, displayed on PDF Forms such as Work Orders, Estimates, and Invoices (if selected to display in Form settings).
Multiple Contacts and Locations
What if your customer has more than one contact or location? That’s easy! After you save the new customer you will see menu tabs appear along the top of the customer page. Select either Contacts or Locations then click the ‘Add New’ button.

Primary and Billing
When creating a job for a customer, the primary contact and address will be automatically selected as the service contact and address. When creating an invoice for the customer, the billing contact and address will automatically be selected. When creating a new customer, the primary and billing checkboxes are automatically selected. Leave these selected. This feature really comes in handy when the customer has multiple contacts and locations.
Financial Details
Optional financial information such as an account number, credit limit, balance, sales tax, etc…
Custom Fields
You will also see an ‘Add Custom Field’ button. You can add as many custom data fields as you want to the customer page for gathering additional data. There are multiple data field types such as input text, checkbox, dropdown, and date.
Notes
All records in Bella FSM have a notes section at the bottom of the page, including the customer page. Users can enter a text note and upload file attachments such as images and contracts. The note has a time stamp of who created it and when.
Make sure to click the ‘Save’ button when done entering information!
Review Customers Overview for a high level customer management overview
Editing a Customer
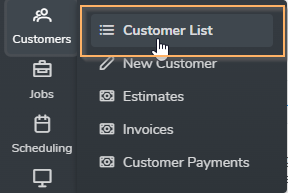
Click the left side menu ‘Customer’ then click ‘Customer List’:

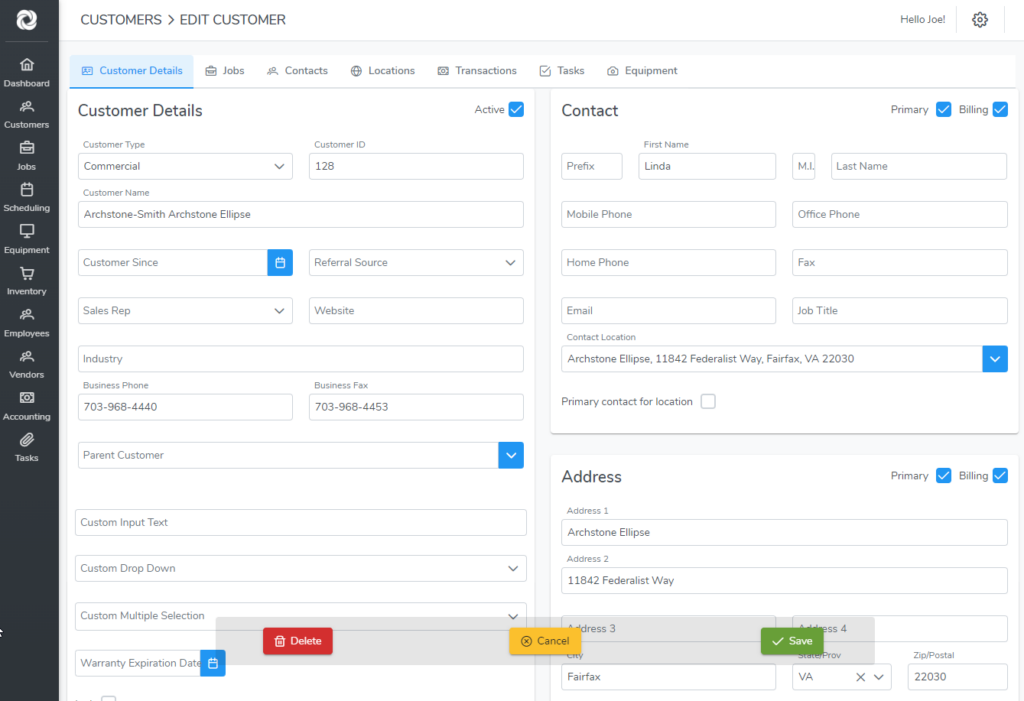
Your Customer List will display. Use the search feature or column filters to find the customer. When found, click the row to open the Edit Customer page:

Edit any of the information you would like to update. Also, there are several customer menu tabs along the top of the page.
Jobs tab
Click the Jobs tab to view a list of all jobs for this customer. View job history, update jobs in progress, or create a new job. These jobs are also listed in the main Job List which contains jobs for all customers.
Contacts tab
Click the Contacts tab to view a list of all contacts for this customer. Edit contacts and create new contacts.
Locations tab
Click the Locations tab to view a list of all locations for this customer. Edit locations and create new locations.
Tasks tab
Click the Tasks tab to view all task associated to this customer. These tasks are also included in the main Task List which contains all tasks for customers, jobs, and general tasks.
Equipment tab
If you have the ‘Equipment Tracking’ activated in your Bella FSM account, the Equipment tab will display. Click the Equipment tab to view and edit all customer equipment that you service.
Make sure to click the ‘Save’ button when done editing information!
