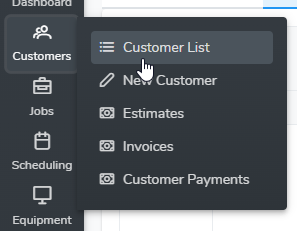
Customer relationship management is critical to all businesses. Manage your customers in the ‘Customers’ tab.
Edit an existing customer click on the Customer ID or Customer Name in the list. To create a new customer click ‘Add a new customer’ left side menu or button at the top of the customer list.
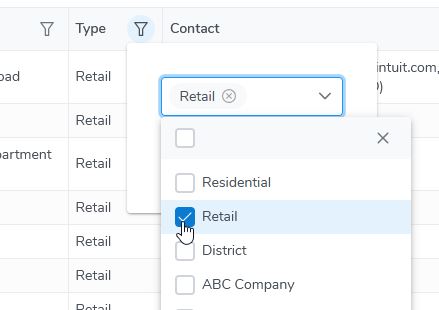
Customer list filters are located along the top of the data table. Filters can be used in combination.
- Display by – Filter for jobs assigned to a specific Field Resource or all Jobs.
- Customer Type – Filter for Jobs assigned to a specific Field Resource or all Jobs.
- Location Zone – Filter by Job Status. Additional Job Status’ can be added in the Admin tab.
- Account Manager – Enter a date range or select a predefined date range from the drop down.
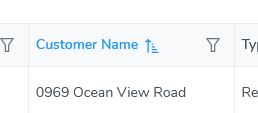
- Column Headings – most columns are sortable. Place your cursor over the column heading and click to sort ascending or descending.
Customer Search is located in the left side menu. Simply start typing in any one of the search boxes and the customer list will narrow with each character entered. These are the four search box options:
- Customer Name
- Customer ID
- Customer Contact
- Customer Location
- Edit a Customer – To edit customer information click on the Customer Name or ID in the table. The left side menus will expand to allow you to edit or add multiple Locations, Contacts, Jobs, Equipment, and To do’s.
- While under the Customer Tab, clicking the left side Jobs menu displays Jobs for that Customer. It is the same information if viewed while under the Jobs Tab by sorting the list by the same Customer.
- Creating a New Customer – Create a new customer by selecting the ‘New Customer’ left side menu and fill in the required fields and save.
- Map It – Print directions to the Customer Location by clicking this link. The Map It link is located in several different areas of the software.
- Multiple Customer Locations – Multiple Locations may be created by clicking the ‘Add Location’ left side menu. Each Location has an assigned ID for easy identification. The Location entered in the Edit Customer page is designated as the ‘Primary Location’. This may be changed at any time. When Scheduling a Job Appointment a User has the option to choose a Location.
- Multiple Customer Contacts – Multiple Contacts may be created by clicking the ‘Add Contact’ left side menu. Each Contact has an assigned ID for easy identification. The Contact entered in the Edit Customer page is designated as the “Primary Contact”. This may be changed at any time. When Scheduling a Job Appointment a User has the option to choose a Contact.
- Customer Equipment – Customer Equipment may be created by clicking the ‘Add Equipment’ left side menu. Each Equipment item has an assigned ID for easy identification. When Scheduling a Job Appointment you have the option to include Customer Equipment. The Customer Equipment details will be attached to the Work Order.
- Customer To do’s – Customer To do’s may be created by clicking the ‘Add To do’ left side menu. A Customer To do functions the same way as all To do’s but is associated to a specific customer.
- Creating a New Job
- Click the ‘Create a new Job’ left side menu. This will open the New Job page which allows you to select an existing Customer or create a New Customer, enter Job Details, Appointment Details, and Job Items. You may enter an Appointment date and time with the small calendar icon or use the Scheduling Calendar button. The Scheduling Calendar gives you the ability to view a specific Field Resource availability or search for any open date and time. The default Job Status is ‘Work Order’ and may be changed. Click Here for more information on how to create a new job.
- Recurring Job Appointments
- To set up Recurring Appointments for a Job, check the ‘Recurring Appointment’ checkbox in the appointment details section of the job page. This will open the frequency options. The options are similar to most standard calendars such as Microsoft Outlook.
- Multiple Job Appointments
- To create Multiple Appointments to complete a Job select the ‘Add Appointment’ left side menu on the job page. Create as many Appointments as needed which will be listed in Appointment List. A different Field Resource may be assigned to each Appointment if desired.
- Customer Portal
- The Customer Portal is used to provide your Customers with ‘self service’. This will enhance your customers satisfaction, reduce your companies work load, and help streamline operations. Essentially, you are creating a Username and Password for a Customer to log into Bella. They will only be able to view their Jobs. You have the option to assign different access levels for each customer. The following steps will walk you through the process of creating portal access for a customer.
- In the Customer tab create a new customer or edit an existing customer and in the contact section check the ‘Portal’ checkbox. The customer portal input fields will display.
- Enter a Username and Password to be used by your customer
- Select the Time Zone for your customer. The default Time Zone is the Time Zone set in the Admin tab Settings page.
- You have three ‘Access Levels’ options. Each Access Level also has additional options to select.
- Schedule Jobs – This access level allows the Customer to Schedule a New Job and make edit to Open Jobs. They will be able to view your Company calendar and select an available date and time and schedule an appointment. They will not be able to view other Customer Names or data. If a time slot if taken it will display ‘not available’. They will also be able to view their Open Jobs and Job History.
- Allow Customer to Select Job Items for a New Job – check this box to allow your Customer to view and select Job Items. If you have a Price Level set for the Customer they will only see that pricing.
- Display Job Items List when viewing Open Jobs and Job History – check this box to allow your Customer to view the Job Items when viewing Open Jobs and Job History.
- View Only – This access level only allows the Customer to view their Open Jobs and Job History.
- Display Appointment Details when viewing Open Jobs and Job History – check this box to allow your Customer to view Appointment Details when viewing Open Jobs and Job History.
- Display Job Items List when viewing Open Jobs and Job History – check this box to allow your Customer to view the Job Items when viewing Open Jobs and Job History.
- Job Requests Only – This access level allows the Customer to request a New Job by entering the Job Name and Job Description. They will also be able to view their Open Jobs and Job History.
- Display Appointment Details when viewing Open Jobs and Job History – check this box to allow your Customer to view Appointment Details when viewing Open Jobs and Job History.
- Display Job Items List when viewing Open Jobs and Job History – check this box to allow your Customer to view the Job Items when viewing Open Jobs and Job History.
- Schedule Jobs – This access level allows the Customer to Schedule a New Job and make edit to Open Jobs. They will be able to view your Company calendar and select an available date and time and schedule an appointment. They will not be able to view other Customer Names or data. If a time slot if taken it will display ‘not available’. They will also be able to view their Open Jobs and Job History.
- Job Alerts – You have the option of selecting a ‘Primary’ and ‘Secondary’ email or text address to send an alert each time a Job is created or updated for this Customer in the Portal. Both drop downs contain your Customer email address and all of your Field Resources email and text addresses. These drop downs may be empty.
- Creating an Estimate
- Create a new job and set the job status to ‘Estimate’.
- Select the customer, enter job details, and select the job items for the estimate.
- Click the ‘Create Estimate’ button which opens the Estimate page to review and confirm all Estimate details. Once the Estimate details are confirmed, click ‘Save’. The ‘Print’ button will then be displayed. Click the Print button to generate a PDF document which may be saved to your computer, printed, emailed, and faxed.
- The job items may be modified and a new estimate created at anytime. To add job items click the ‘Add Job Items’ button in the Job Items section of the Edit Job page. To edit a Job Item click the Item Name in the list to modify the quantity, price, or completion date of the Job Item.
- Scheduling a Work Order
- A Work Order can be scheduled by creating a new job or editing an existing job and assigning a Field Resource and entering the appointment start date/time and end date/time on the job page.
- Once you have entered all of the job and appointment information click ‘Save’. Click Work Order PDF button to generate the Work Order PDF which may be saved to your computer, emailed, printed, and faxed.
- If a job with status of ‘Estimate’ was previously created and you have won the business, create a Work Order by simply updated the Job Status to ‘Work Order’, enter the appointment information and click ‘Save’.
- Creating an Invoice
- To create an Invoice click the ‘Create Invoice’ button in the Job Item section of the Edit Job page. Check all Job Items to be invoiced. To create a partial invoice check the desired Job Items to be invoiced. As a default, when creating an invoice, all Job Items marked ‘complete’ will be automatically checked for invoicing. The Job Item ‘Completed’ feature would be used if the Job is still in progress but partial payment is required. To prevent billing errors, once a Job Item is invoiced it may not be selected again. Confirm all details for the Invoice and click ‘Save’. When saved, an invoice transaction is created.
- To generate the Invoice PDF document click ‘Print’. The invoice PDF may be saved to your computer, printed, emailed, or faxed. The invoice is also accessible by clicking ‘PDF’ in the Invoice List in the Accounting tab.
- To edit an invoice click on the Invoice Total or Invoice Number in the Invoice List in the Accounting tab. You can also view the invoice transaction in the Customer or Job Transaction List by clicking the left side menu ‘Customer Transactions’ or ‘Job Transactions’.
- To mark the Invoice paid, enter a ‘Receive Payment’ transaction in the Accounting tab or click ‘Payment’ in the Invoice List in the Accounting tab.