FAQ

How do I create a Job?

There are several ways to create a new job:

  • Click the left side menu ‘Jobs’ then ‘New Job’.
  • Click the left side menu ‘Jobs’ then ‘Job List’. Click the ‘New Job’ button at the top of the list.
  • Click on an open time slot in the calendar Day or Week views.

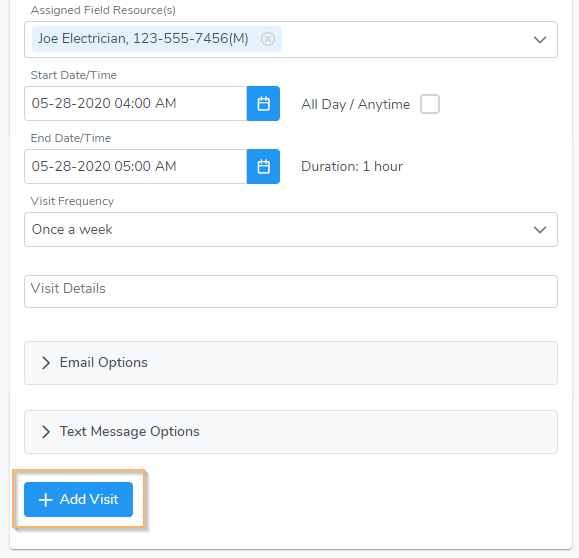
When the new job page opens – select a customer, enter job details, visit details, assign a Field Resource, and job items (products and services). The only required field is Job ID. You can schedule a visit and assign a Field Resource at any time.

What are Work Types?

Think of Work Types as skill sets or certifications. Work Types can be assigned to Field Resources (Employees and Vendors) as well as Items.

In the Job Visit section of the job page, you have the option to assign one or more Work Types. If assigned, the Field Resource and Job Items dropdown options are filter to only display the ones assigned that Work Type.

Create as many Work Types as needed by clicking the gear icon in the upper right corner then select ‘Work Types’

Admin Users can turn the Work Type feature on/off by clicking the gear icon in the upper right corner then ‘Account Settings’.

Can I set up a service or maintenance contract?

Of course! Create a custom Job Status such as ‘Contract’, ‘Maintenance Contract’, ‘Service Contract’, etc… by clicking the gear icon in the upper right corner and then ‘Custom Terms’. After the Custom Terms page opens click ‘Job Status’ then the ‘New Job Status’ button.

Create a new job or edit an existing job and assign the Job Status. The Job List can be sorted by Job Status for easy tracking. Select the ‘Visit Frequency’ in the Job Visit section on the job page to match the contract.

You can attach a signed contract to the job for easy access by clicking ‘Add’ button in the Note & Attachments section at the bottom of the job page.

How do I run reports?

All lists have a report feature. Click the small icon with three white bars in the upper right corner of the list.

Click either ‘CSV Report’ or ‘Excel Report’. Which ever columns you have displayed will be included in the report.

You can also filter the list before you run the report by clicking the funnel icon in the column header.

How do I create a custom price list for a customer?

To create a custom price list for a customer following these steps:

  • Click the left side menu ‘Accounting’ then ‘Price Level List’
  • At the top of the Price Level List click ‘Add Price Level’
  • Create either a ‘Per Item’ or ‘Fixed %’ price level and save
  • Go to your Customers List and open a customer
  • Select the Price Level in the drop down located in the ‘Financial Details’ section towards the bottom of the page
  • Save the customer

Every time you create a job for this customer, the assigned price level be automatically selected for the Job Items added. You have the option to change the Price Level individually for each job item if needed.

How do I create an Invoice?

Create an Invoice by first creating a new job or opening an existing job. If creating a new job then select the customer, enter the job details and job items (products and services).

Click the ‘Action’ button at the bottom of the job page then click ‘New Invoice’.

The Invoice page will open. Confirm all of the details and save. Click the Action button the ‘Invoice PDF’ to generate the Invoice PDF.

The Job Items may be modified at anytime directly on the Invoice page by clicking the ‘Services / Products’ button in the Items section or edit an Item by clicking on it in the list.

How do I create a Work Order?

Create a new job and enter the job details, job visit information, and job items (products and services). The Work Order PDF can be generated by clicking the ‘Action’ button then ‘Work Order PDF’ at the bottom of the job page.

You can add as many visits to a job as needed and print and email a Work Order PDF for each visit.

How do I create an Estimate / Proposal / Quote?

Create an Estimate by first creating a new job or opening an existing job. If creating a new job then select the customer, enter the job details and job items (products and services).

Click the “Action” button at the bottom of the job page then click “New Estimate”.

The Estimate page will open. Confirm all of the details and save. Click the “Action” button at the bottom of the Estimate page then click “Estimate PDF” to generate a Estimate PDF.

The Job Items may be modified at anytime directly on the Estimate page by clicking the “Services / Products” button in the Items section or edit an Item by clicking on it in the list.

What is the difference between a User and Employee?

A ‘user’ is someone who is assigned a username to be able to log into the software. You can assign a username to an employee or vendor.

The monthly subscription for Bella FSM is based on the number of users, not employees or vendors. For example, you can only pay for two users but have 25 technicians that you are scheduling.

There are two user types, ‘Admin’ and ‘Standard’. An Admin user is able to set access levels for ‘Standard’ users and provide them with a username and password. A Standard user can be an employee or vendor (subcontractor) such as an outside accountant, subcontractor, or call center.

How do I schedule multiple visits for a job?

If multiple visits are needed to complete a job, click the ‘Add Visit’ button in the Job Visit section on the job page. You can add as many visits to a job as needed. To view the list of Visits for a job click the ‘Visits’ tab at the top of the job page.

Job Page Add Visit Button

How do I schedule a recurring visit?

To schedule a recurring job visit, create a new job or open an existing job. In the Job Visit section select a ‘Visit Frequency’ from the dropdown. You can select one of the standard frequencies or ‘Custom’ (image below). If you select Custom, several options will display which are similar to most standard calendars such as Microsoft Outlook and Google.

NOTE – A non-recurring job visit cannot be changed to a recurring job visit (the Visit Frequency dropdown will not display). Simply add another visit to the job and make it recurring or create a new job with a recurring visit. The frequency of a recurring can be modified.

Visit Recurring Options


How do I run a report for a specific date range?

All data list can be filtered by clicking the small funnel icon in the column header. For example, in the Job List click the funnel in the ‘Next Service’ column header and the date range filter will open.

Don't have a Bella FSM account yet? Start streamlining your business today!
Signup Now